Stay Informed
Report Emergency
Downtown Campus Police
568-8999
Florida Avenue Campus Police941-8100
Send a UTIPLSU Shield Mobile App
Digital Signage Documentation
A new digital signage template has been developed to fluidly incorporate interactivity. We took this opportunity to refresh the signage for both new interactive and non-interactive signage across campus. A new process for submitting events and recurring posts to display on the digital signage has also been implemented.
Table of Contents
-
Event Image Generator Documentation (Create an Image From Form Data)
Overview of New Templates
INTERACTIVE TEMPLATE

NON-INTERACTIVE TEMPLATE

The interactive and non-interactive version of the sign both have three sections of
content:
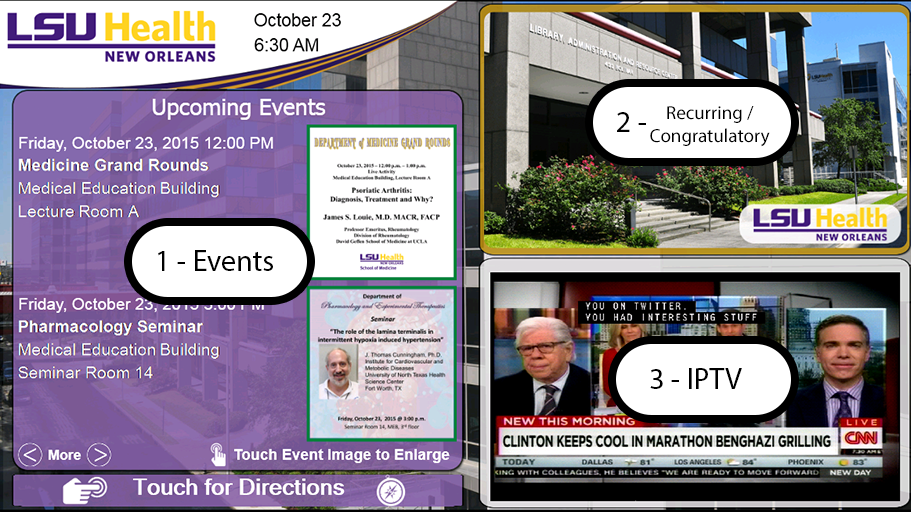
1 - Events Section
The upcoming events section contains information for events that are less than two weeks away from the current date. Events and their corresponding images are submitted using the newly developed submission form.
- The submission form can be found here.
- Information and templates regarding event signage images can be found here.
2 - Recurring / Congratulatory Section
The recurring / congratulatory section displays congratulatory, campus safety and informational signage. Signage for this section will be submitted through the newly developed submission form.
- The submission form for recurring signage can be found here.
- Information and templates regarding recurring signage images can be found here.
3 - News Section
The news section displays information from syndicated news sources.
Events Section
About Events
- All events posted to the digital signage system must be submitted for approval using
the DSRequest form
- All events must have a start and end time
- Events are displayed for two weeks prior to the event
- A separate event image should be created for each event.
- If an event occurs on 10/11 and 10/13 two separate requests for posting should be
submitted.
- If an event occurs on 10/11 and 10/13 two separate requests for posting should be
submitted.
- All events must have an image created using the official templates (image templates can be found here)
- Events must be uploaded in either PNG or JPG image format (PowerPoint can be used
to create your sign, however, PPT(X) files must be saved as an image before being
uploaded through the request application (Click here for instructions on how to export a PowerPoint slide as a JPEG image)
- If you do not wish to create a custom image for an event you can use our "Event Image Generator" (Click here for more info)
- Events must be uploaded in either PNG or JPG image format (PowerPoint can be used
to create your sign, however, PPT(X) files must be saved as an image before being
uploaded through the request application (Click here for instructions on how to export a PowerPoint slide as a JPEG image)
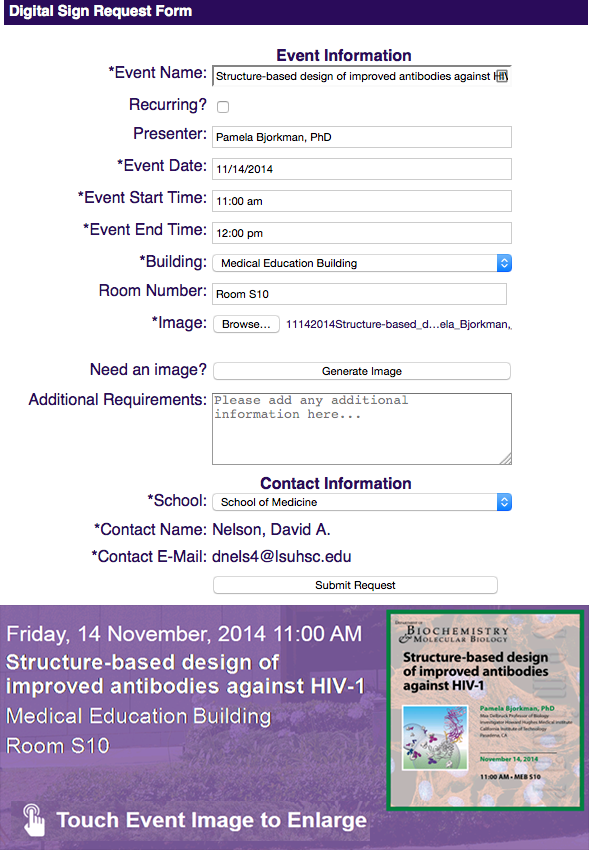
How to submit an event to display on the digital signs
- Navigate to the DSRequest form (http://intranet.lsuhsc.edu/alerts/digitalsignage/request.aspx)
- Fill out form with information as it should display on the sign
- Below you can see a screenshot of the form filled out, and below that, how the event looks on our new interactive display monitors (Currently in use inside the new Human Development Center building)
- Once a sign is submitted using the form a request is sent to the organizational area's
content approver to review.
- Once the sign is approved the original requestor receives an approval email.
- The approved signs that are less than two weeks from the event date can be viewed
on all campus signs and the LSUHSC events page (http://www.lsuhsc.edu/events/)
Recurring Section
About Recurring Posts
- Recurring posts (Campus safety and informational signage) display in the top right
"Recurring" section of the digital signs
- Recurring posts need to be sized to the 891x501 landscape format (image templates found here)
- Recurring posts must be uploaded in either PNG or JPG image format (PowerPoint can
be used to create your sign, however, PPT(X) files must be saved as an image before
being uploaded through the request application (Click here for instructions on how to export a PowerPoint slide as a JPEG image)
- Recurring posts display continously for up to three months (If longer display is desired - a post with updated content must be submitted)
How to Submit a Recurring Posting for Display
- Navigate to the DSRequest form (http://intranet.lsuhsc.edu/alerts/digitalsignage/request.aspx)
- Check the "recurring" box and fill in the remaining fields
- Once a sign is submitted using the form a request is sent to the organizational area's
content approver to review.
- Once the sign is approved the original requestor receives an approval email.
Event Image Generator
- You can use the event image generator included in the request form to create an evemt
image from the data filled in on the forml. This is useful for events you do not wish
to create custom event images for. You can view instructions for this process below
and view an example image created using the generator here.
- We will no longer be displaying Exchange Calendar Events on the Digital Signage - If you would like to submit your event to display on the sign, but do not wish to create a custom event image, you can use the "Generate Image" button on the signage request form to generate an image from the data filled in the form.
Steps to use the image generator to create and submit an event:
- Navigate to the DSRequest form (https://intranet.lsuhsc.edu/alerts/digitalsignage/request)
- Fill out all required fields
- Click "Generate Image" (A pop up window will appear - You may need to disable your pop up blocker to view)
- In the pop up window you can choose to "Preview" the image
- You can edit the fields to change the image as needed.
- Click the "Download Image" button to download the image to your local computer (The
image will be saved to your downloads directory as "sign.jpg")
- Return to the DSRequest form and click "Choose file"
- Navigate to your downloads folder and select "sign.jpg"
- Remember to update any fields on the form that you may have changed while creating
your image
- Click "Submit Request" to complete the request and send it for approval